
Nolan N100-5 Mode-D-Emploi
Manuel PDF · 116 Pages
Français



Vérification rapide
Réponse incorrecte, veuillez réessayer.
Discutez avec votre manuel Nolan N100-5 grâce à l'IA
Obtenez des réponses instantanées par IA à partir de votre manuel Nolan N100-5
Posez toutes vos questions concernant le Nolan N100-5. Les réponses proviennent de ce manuel, avec les pages dont elles sont tirées.
N100-5 Programme d'entretien
Laisser sécher le casque dans un endroit ventilé avec la visière ouverte après utilisation. Tenir à l'écart des sources de chaleur.
Retirer la visière intérieure et nettoyer délicatement avec du savon liquide neutre et un chiffon humide. Rincer sous l'eau courante.
Vérifier régulièrement l'étirement correct pour éviter tout mouvement et rayage des surfaces.
Si la visière est endommagée ou profondément rayée réduisant la visibilité, remplacez-la immédiatement.
Lavage à la main uniquement dans de l'eau tiède (max 30 C) avec du savon neutre. Ne pas laver en machine.
Poser une Question
Recommandez-vous N100-5?
Oui NonFoire aux Questions
C’est un casque moto modulable avec mentonnière relevable, système de visière, protection solaire interne et fonctionnalités axées sur le confort pour un usage routier quotidien.
Cette réponse est-elle utile?
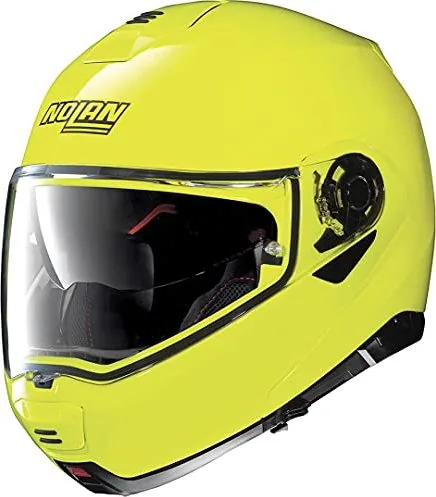
La finition haute visibilité aide le motard à mieux se distinguer dans la circulation, ce qui peut être particulièrement utile en ville, par faible luminosité ou par météo changeante.
Cette réponse est-elle utile?
La mentonnière utilise un système d’ouverture en deux étapes avec des leviers séparés pour le déverrouillage et l’ouverture. Cela facilite l’utilisation d’une seule main tout en réduisant le risque d’ouverture accidentelle.
Cette réponse est-elle utile?
Oui. Le casque permet une position d’ouverture minimale de la visière pour favoriser l’aération, et il peut aussi être utilisé avec une visière intérieure Pinlock pour améliorer la résistance à la buée en conditions humides ou froides.
Cette réponse est-elle utile?
Oui. Les mousses de joues, le tour de cou et la coiffe sont amovibles, ce qui facilite le nettoyage et aide à conserver un meilleur ajustement et un intérieur plus frais au fil du temps.
Cette réponse est-elle utile?
Oui. Le casque est préparé pour les systèmes de communication N-Com, selon la version. Certaines pièces de mousse interne peuvent devoir être retirées lors de l’installation de composants compatibles.
Cette réponse est-elle utile?
Avantages et Inconvénients
Avantages

- La mentonnière Dual Action améliore la praticité et aide à prévenir les ouvertures accidentelles.
- Le design haute visibilité augmente la présence du motard dans la circulation et en faible luminosité.
- Le pare-soleil VPS et la compatibilité Pinlock améliorent la visibilité par météo changeante.
- Le rembourrage amovible et le système de ventilation améliorent le confort et facilitent l’entretien.
Inconvénients

- La conception modulable peut sembler plus complexe qu’un simple casque intégral.
- La visière, le VPS et les pièces Pinlock doivent être manipulés avec soin pour éviter les rayures ou l’usure.
- La protection dépend d’un bon ajustement et d’une fermeture correcte, donc la taille est essentielle.
- Certains accessoires et fonctionnalités peuvent varier selon la version ou nécessiter une installation séparée.
Produit Spécification
Type
Casque Modulable
Caracteristiques
Visiere Solaire Integree
Poids
1,65 kg
Description du Produit
Nolan N100-5 Haute visibilité (tailles variées)
Le Nolan N100-5 Hi-Visibility est conçu pour les motards qui recherchent un casque modulable pratique, avec une forte priorité accordée à la sécurité, à la visibilité et au confort au quotidien. Pensé pour un usage moto, il associe une mentonnière relevable, un système de visière transparente et une finition haute visibilité qui aide le pilote à mieux se distinguer dans la circulation. L’ensemble est moderne, fonctionnel et adapté à une utilisation réelle.
L’une de ses caractéristiques remarquables est le système de mentonnière Dual Action. Ce mécanisme est conçu pour être ouvert d’une seule main tout en aidant à réduire le risque d’ouverture accidentelle. Les motards peuvent passer d’une configuration complètement fermée pour une protection maximale à une configuration ouverte pour plus de praticité lors des arrêts ou dans un trafic plus lent. Cette flexibilité rend le casque attractif aussi bien pour les trajets quotidiens que pour le touring.
La visibilité est un autre atout majeur. Le casque prend en charge une visière extérieure standard, une position d’ouverture minimale pour favoriser l’aération et le désembuage, ainsi qu’un pare-soleil interne VPS pour les conditions lumineuses intenses. Pour les motards confrontés à des conditions météo changeantes, la visière intérieure Pinlock en option ajoute une protection antibuée supplémentaire. Ensemble, ces éléments aident à conserver une vision plus claire de la route lorsque la température baisse, que l’humidité augmente ou que le soleil devient plus agressif.
Le confort et l’adaptabilité sont également très soignés. Le rembourrage intérieur amovible, les mousses de joues et les parties du tour de cou sont conçus pour améliorer l’ajustement et faciliter le nettoyage. Le système de ventilation aide à faire circuler l’air frais dans le casque, à réduire l’accumulation de chaleur et à limiter la buée sur la visière. De plus, le casque est préparé pour les systèmes de communication N-Com, ce qui en fait un choix intelligent pour les motards qui souhaitent rester connectés sans compromettre leur confort.
Notes
- Idéal pour les motards à la recherche d’un casque modulable offrant une grande polyvalence au quotidien.
- Disponible en plusieurs tailles, il est important de vérifier soigneusement l’ajustement pour garantir stabilité et confort.
- Suivez les consignes de nettoyage et d’entretien afin de protéger la visière, le rembourrage et le pare-soleil.
- Une inspection régulière des sangles, des pièces de la visière et des systèmes de verrouillage aide à préserver les performances dans le temps.
- Le style haute visibilité apporte un avantage pratique en matière de sécurité dans la circulation dense et en conditions de faible luminosité.
Rechercher 67 706 Manuels en ligne


Tapez la marque ou le modèle